How to Build Local AI Agents: A Privacy-First Guide
• Jiahao • 11 min read
Learn how to build privacy-first AI agents that run entirely on your hardware.
Learn how to build privacy-first AI agents that run entirely on your hardware.
Here’s what we’ll cover: how to build AI agents that run entirely on your machine, keeping your data under your control.
Hardware specifics: 5GB VRAM gets you 7B models, 10GB for 14B. NVIDIA GTX/RTX cards with 8-12GB are the sweet spot for 2025.
Start small: Ollama handles model management, LangGraph orchestrates agents. Both install in minutes and give you OpenAI-compatible APIs out of the box.
Security isn’t optional: Run agents on 127.0.0.1 only, use Docker with read-only filesystems, and set up role-based access control from day one.
Track the right metrics: First-Contact Resolution (aim for 70-75%), response latency under 800ms, and cost per task—not just token counts.
Deploy gradually or fail fast: Start with 1-5% traffic, bake evaluations into your CI/CD pipeline, and version everything. Trust me, you’ll thank yourself when production breaks at 2am.
Local AI agents hit 10-50ms response times with full data privacy. The upfront hardware cost replaces $300-500/month in API fees—after about 6-8 months, you’re money ahead. But honestly, the privacy angle alone sells this to most people I talk to.
So what if your AI agents could handle complex tasks without sending a single byte to the cloud?
That’s exactly what local AI agents do. These are self-directed programs that handle everything from data analysis to natural language processing—running on your own hardware. No recurring API bills, no vendor lock-in, and your data never leaves your machine.
Surprisingly, this isn’t as hard as it sounds. Whether you want a simple Q&A bot or a complex multi-agent system, I’ll walk you through the whole process.
We’ll cover setup requirements, security implementation, and production deployment. Let’s get into it.
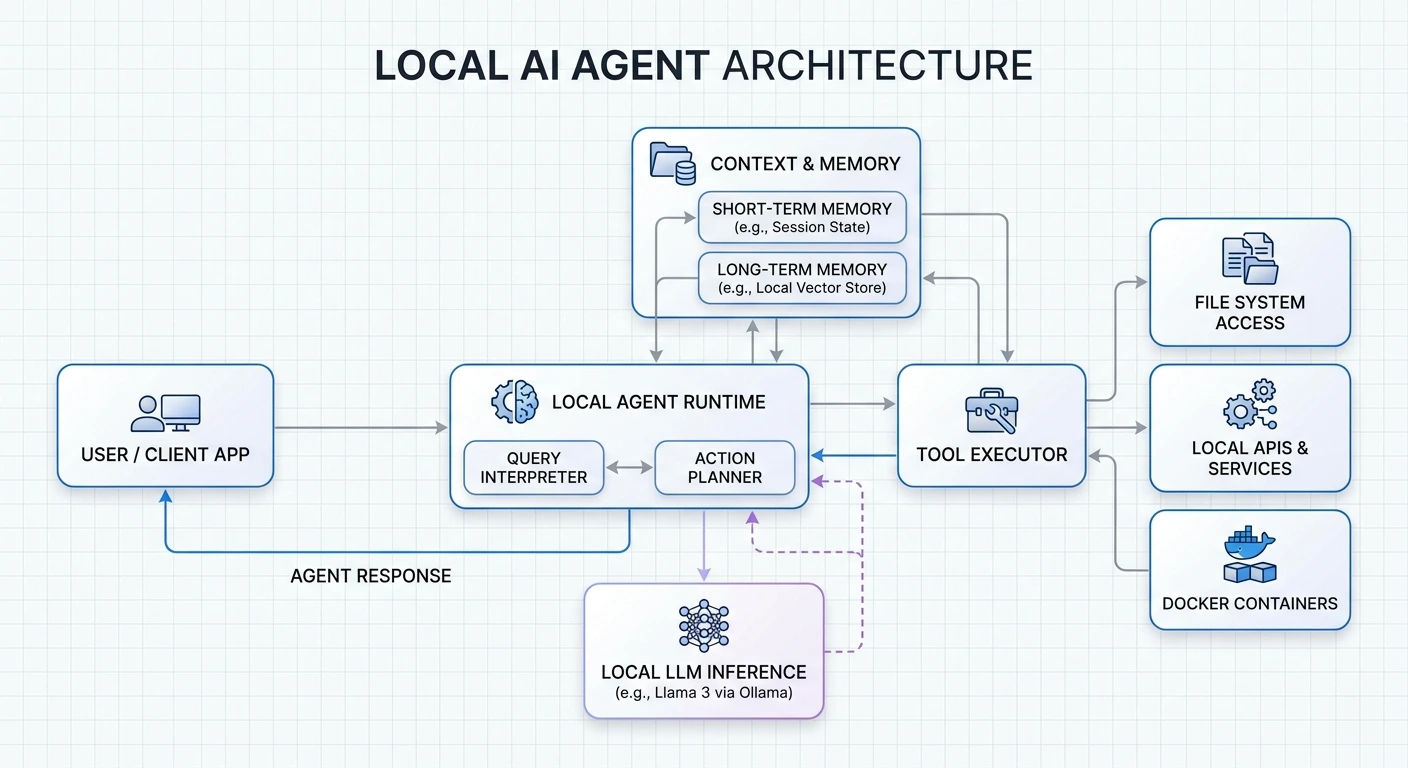
A local AI agent has three moving parts, all running on your device:
If any of these touches an external server by default, it’s hybrid, not fully local.
Why bother? Three reasons:
Speed. Local models respond in 10-50ms. No network round-trips.
Privacy. Your data never leaves your infrastructure. This matters a lot for healthcare, legal, or any confidential work. I’ve talked to companies handling patient records who switched to local specifically because of compliance requirements.
Cost. After the initial hardware investment, you’re done paying. That $300-500/month API bill? Gone. Most folks break even within 6-8 months.
VRAM is your bottleneck. When running local models, VRAM is the workspace where the entire model lives. Here’s the rough guide for quantized 4-bit models:
For GPUs, an NVIDIA GTX/RTX card with 8-12GB VRAM is the practical minimum for 2025. The 3060 12GB or 4060 Ti 16GB work well for casual experiments. If you’re serious, the 4090 or A100 will save you a lot of waiting.
Apple M-series chips are worth considering. Their unified memory architecture lets CPU and GPU share one high-bandwidth pool. A MacBook Pro with 64GB unified memory can actually run 70B models decently. Surprised me too.
For software, you need:
Ollama supports macOS, Windows, and Linux. Installation is straightforward:
# macOS/Linux
curl -fsSL https://ollama.com/install.sh | sh

# For LangGraph
pip install -U langgraph
pip install -U langchain
After installation, Ollama runs in the background and serves an API at http://localhost:11434. Budget at least 4GB for the binary itself, plus whatever space your models need—those can range from a few GB to hundreds.
Start with 7B to 14B models if you’ve got 8-16GB VRAM. Good options include Llama 3.3 8B, Mistral Nemo, or Qwen 3.
A few practical tips:
If you’re not sure, just start with Qwen 3 8B. It’s capable, handles tool calling well, and doesn’t require a monster GPU.
Create an isolated Python environment. This prevents dependency conflicts and makes debugging much easier:
mkdir ai-agent-project && cd ai-agent-project
python -m venv .venv
source .venv/bin/activate  # Windows: .\.venv\Scripts\Activate.ps1
Install the packages you need:
pip install openai langchain langchain-community python-dotenvOr use uv if you want faster dependency resolution:
uv pip install openai langchain langchain-community python-dotenvStart Ollama and pull your model:
ollama serve
ollama pull qwen3:8b
Now configure your client to connect:
from openai import OpenAI

client = OpenAI(
    base_url="http://localhost:11434/v1",
    api_key="ollama"  # Required but not used for local
)
This OpenAI-compatible interface means you can swap between local and cloud models by changing one config line. Useful for testing.
Here’s where LangChain comes in. You’ll use the create_tool_calling_agent function:
from langchain.agents import AgentExecutor, create_tool_calling_agent
from langchain_ollama import ChatOllama
from langchain_core.prompts import ChatPromptTemplate

# Initialize the model
llm = ChatOllama(model="qwen3:8b")

# Define tools
tools = [...]  # We'll add these next

# Create the agent
prompt = ChatPromptTemplate.from_messages([
    ("system", "You are a helpful assistant with access to tools."),
    ("human", "{input}"),
    ("placeholder", "{agent_scratchpad}")
])

agent = create_tool_calling_agent(llm, tools, prompt)
agent_executor = AgentExecutor(agent=agent, tools=tools, verbose=True)Tools let your agent do things beyond just generating text. Here’s how to create one:
from langchain_core.tools import tool

@tool
def calculate_bmi(weight_kg: float, height_m: float) -> float:
    """Calculate BMI given weight in kg and height in meters."""
    return weight_kg / (height_m ** 2)

# Add more tools as needed
tools = [calculate_bmi]
The docstring matters. The LLM reads it to decide when and how to call your tool. Be specific.
Run it:
result = agent_executor.invoke({
    "input": "If I weigh 70kg and am 1.75m tall, what's my BMI?"
})
print(result["output"])
Turn on verbose mode to see what’s happening under the hood:
agent_executor = AgentExecutor(
    agent=agent,
    tools=tools,
    verbose=True  # Watch the reasoning unfold
)
Watch for hallucinations—where the agent invents tool arguments—or missed opportunities where it should have used a tool but didn’t. Both signal you need to tweak your prompts or tool definitions.
By default, agents have no memory. Each conversation starts fresh. That’s fine for simple tasks, but gets annoying fast.
Two types of memory to consider:
Short-term memory: Keep recent conversation turns in a sliding window. LangChain’s ConversationBufferWindowMemory handles this. Typical window: 10-20 messages.
Long-term memory: Store facts about the user, preferences, and past interactions. Pull out what matters using semantic search when relevant.
A practical approach: extract important information periodically and store it in a vector database. When the agent starts a new conversation, retrieve relevant context before processing.
Single agents hit limits. Multi-agent systems split work across specialized agents that collaborate.
Three common patterns:
Sequential: Agent A’s output feeds into Agent B. Good for linear workflows—write first, then edit, then publish.
Concurrent: Multiple agents work on the same problem simultaneously, then combine results. Useful for gathering information from different angles.
Hierarchical: A manager agent delegates to worker agents. The manager decides who does what and aggregates results.
For production, I recommend orchestration over direct agent-to-agent communication. It’s easier to debug and lets you swap agents in and out without breaking everything.
Three protocols worth knowing:
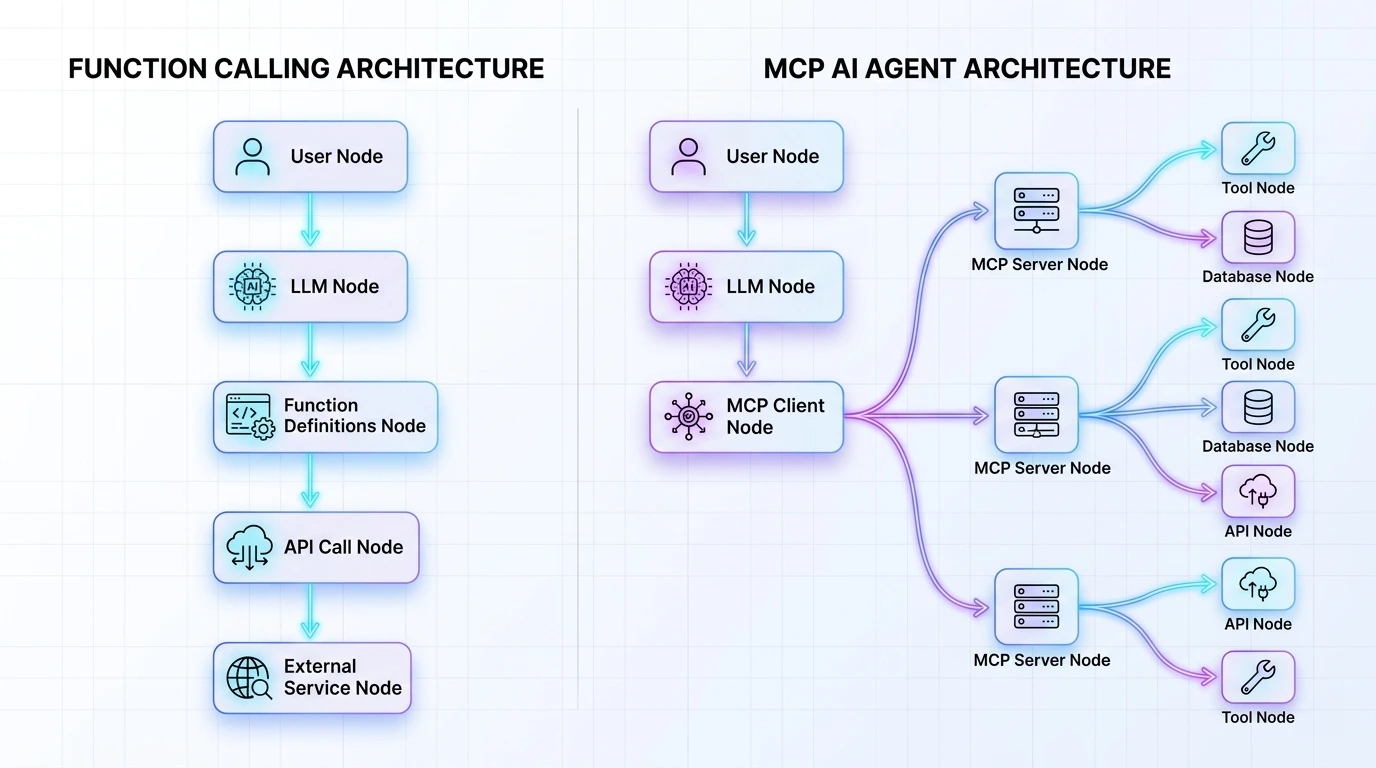
MCP (Model Context Protocol): Connects agents to external tools and data sources. Think of it as USB-C for AI—standardized, flexible.
A2A (Agent-to-Agent): Enables agents to discover each other and exchange information. Still emerging, but promising.
ACP (Agent Communication Protocol): Coordinates workflow orchestration and task delegation.
For now, MCP is the most mature. It handles authentication, capability negotiation, and context sharing. Your agents expose what they can do through tool descriptions, and others discover them automatically.
This matters more than most people think. I’ve seen deployments that were essentially leaving the door wide open.
Network isolation: Bind to 127.0.0.1 only. No exceptions unless you have a very specific reason and proper firewall rules.
Authentication: Generate tokens with openssl rand -hex 32 and require them for all connections.
Containerization: Run agents in Docker with read-only filesystems. No host network access unless absolutely necessary.
Access control: Implement role-based permissions. Agents should have scoped tokens tied to specific users or purposes.
Audit logging: Log everything—agent actions, tool calls, permission decisions. Use immutable storage for these logs.
Least privilege: Give agents only the permissions they absolutely need. Not “just in case.”
Four areas to focus on:
Quantization: Reduces model precision from FP32 to INT8 (or even INT4). Much faster inference with minimal accuracy loss. Most models available in quantized versions now.
Regional deployment: If you’re serving users in Europe, host your inference in Europe. Network latency to distant datacenters kills performance.
Caching: If users ask similar questions, cache frequent responses. Skip the inference entirely.
Model selection: Not every task needs a 70B model. GPT-4.1-nano or similar small models handle tool-calling tasks just fine and respond much faster.
What are people actually building?
The common thread: sensitive data that shouldn’t go to the cloud.
Three categories of problems I see most:
Environment issues: Dependency conflicts, syntax errors, wrong Python paths. Virtual environments fix most of this.
Multi-agent failures: Poor task specification, agents talking past each other, no verification of results. Write clear agent roles and add checkpoints.
Data problems: Fragmented enterprise data, incompatible formats, missing context. Agents can’t work miracles with garbage data.
Also: set up monitoring from day one. You’ll otherwise miss silent failures where the agent returns wrong answers without throwing errors.
What to track:
Here’s what separates successful deployments from failed ones:
Start small. 1-5% traffic rollout. Watch for problems. Scale gradually.
Automate evaluations. Integrate testing into your CI/CD pipeline. Every code change potentially breaks agent behavior. Test for it.
Observability first. Don’t bolt this on later. You won’t remember what broke production at 2am without logs.
Version everything. Prompts, model checkpoints, config parameters. Enable debugging.
Rollback strategy. If things go wrong at 2am, you need to revert fast. Automate this.
One more thing: industry data shows 39% of AI projects fail. The main reasons are inadequate evaluation and poor monitoring. Fix those two and your odds improve dramatically.
You now have everything needed to build your own local AI agents from scratch. Start with a simple single-agent system using a 7B or 8B model, test it thoroughly, and add complexity as your requirements grow.
The key is consistency: monitor performance, iterate based on real usage, and prioritize security from day one.
Your data stays private. Costs stay predictable. You maintain complete control.
Start building today. Scale at your own pace.
Q1. What hardware do I need to run AI agents locally on my computer? You’ll need a GPU with enough VRAM. For quantized 4-bit models: 5GB for 7B models, 10GB for 14B, 20GB for 32B, 40GB for 70B. An NVIDIA GTX/RTX card with 8-12GB VRAM works as a practical minimum for 2025. Apple M-series chips with unified memory are surprisingly capable—I’ve seen a 64GB M3 Max run 70B models.
Q2. How fast are local AI agents compared to cloud-based solutions? Local agents hit 10-50ms response times. That’s significantly faster than cloud alternatives, which add network latency on top of inference time. You’re also not paying per request, so speed doesn’t directly affect your costs.
Q3. What are the main security benefits of running AI agents locally? Your data never leaves your infrastructure. Bind agents to 127.0.0.1, require authentication tokens, use Docker with read-only filesystems. Log everything to immutable audit trails. For compliance-heavy industries (healthcare, legal, finance), this is often the only viable approach.
Q4. Which AI models should beginners start with for local agents? Start with 7B-14B models if you have 8-16GB VRAM. Qwen 3 8B, Llama 3.3 8B, or Mistral Nemo are good choices. Mac users: GGUF format. Windows/Nvidia users: AWQ format. Qwen 3 handles tool calling well if that’s your use case.
Q5. What are common real-world applications for local AI agents? Data science for non-coders, local financial analysis, media processing with ffmpeg, customer service triage, healthcare scheduling, HR automation. The sweet spot is any use case involving sensitive data that shouldn’t leave your systems.
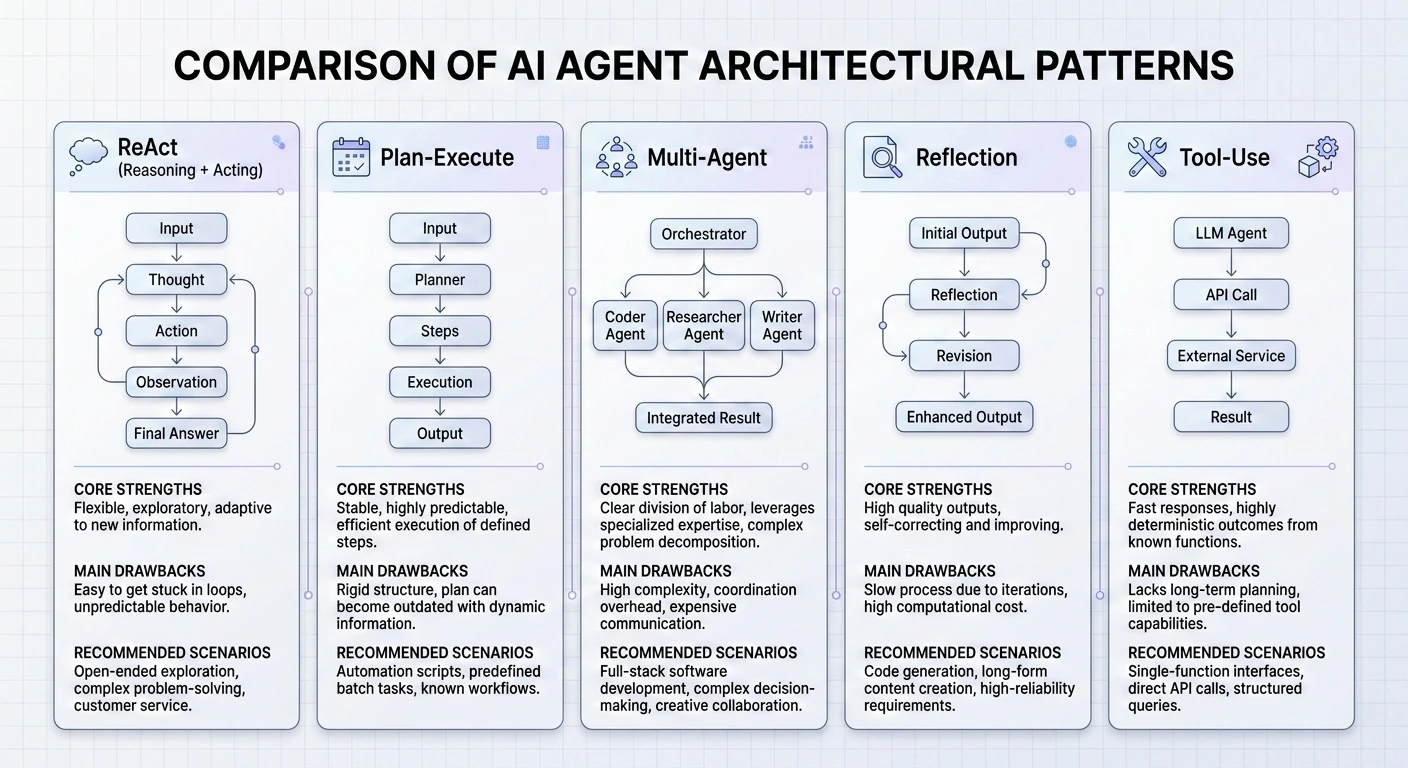
Master the 5 essential AI agent design patterns for 2026: ReAct, Plan-and-Execute, Multi-Agent, Reflection, and Tool Use.
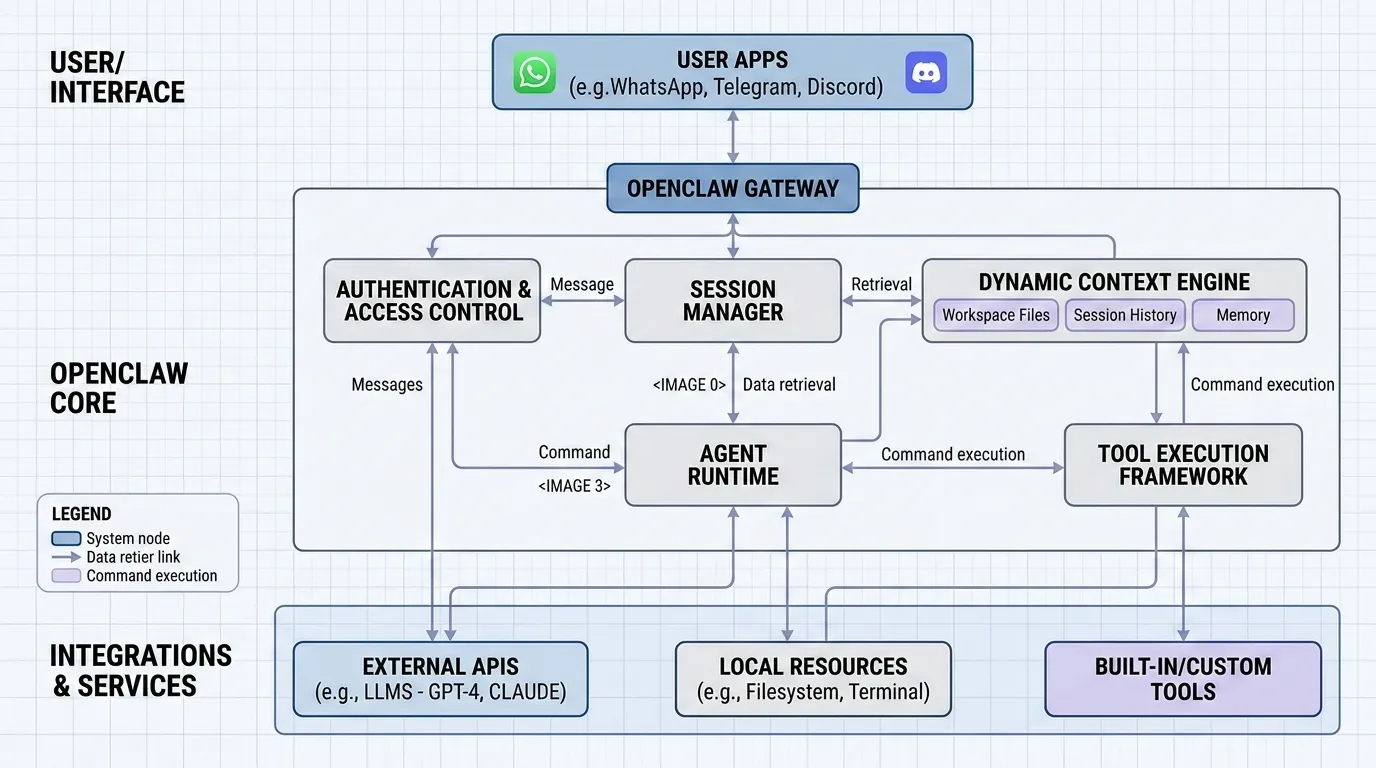
Explain in detail how openclaw work.
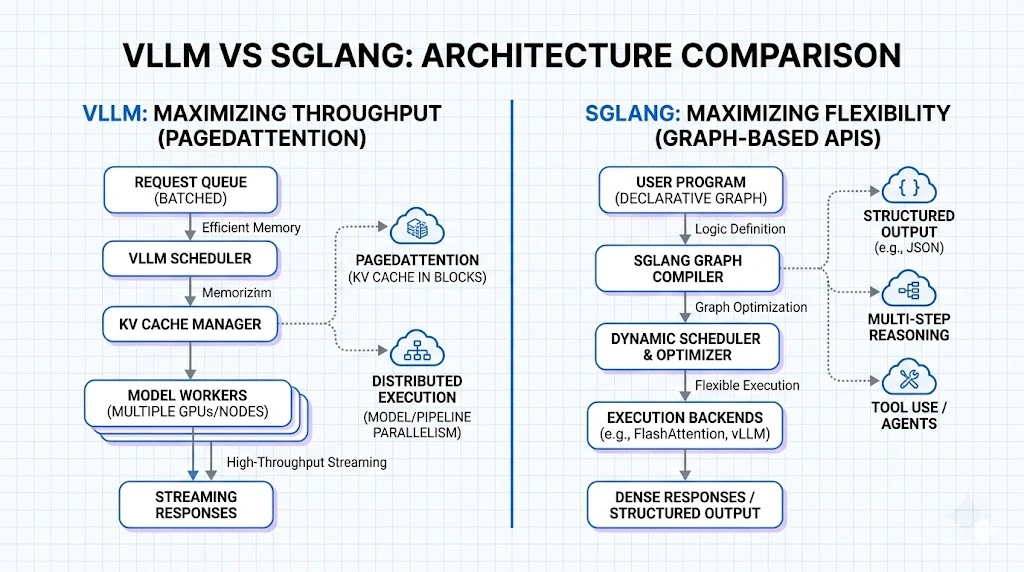
Compare vLLM and SGLang for enterprise AI deployment.
Learn how MCP provides scalable, secure AI tool integration.